If you write documentation, blog posts, README files, or technical guides, you already know how frustrating it is to keep switching between your text editor and a browser just to see how your Markdown looks. Every time you tweak a heading, a table, or a code block, you have to refresh, wait, check, and go back.
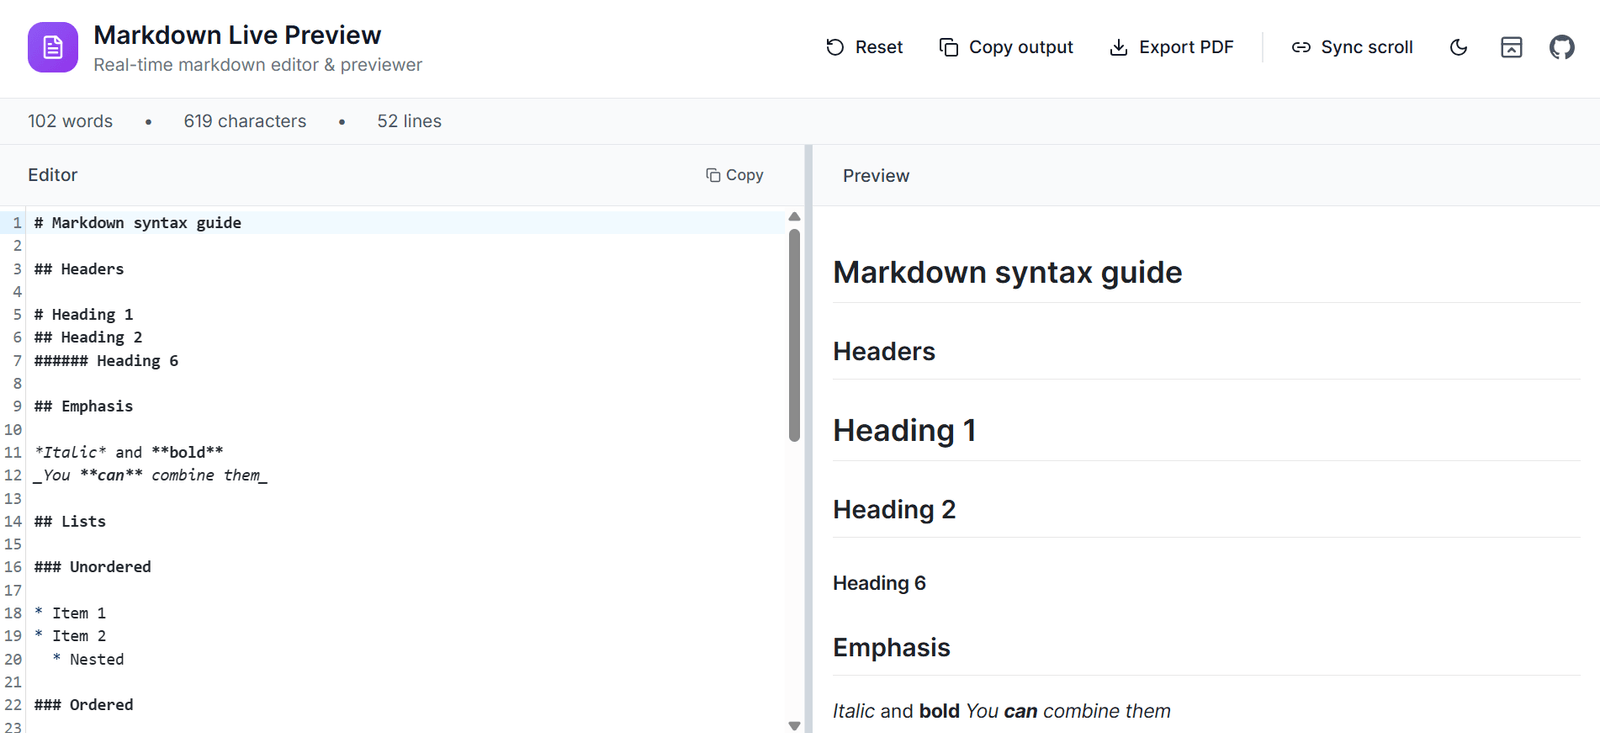
That's exactly the problem Markdown Live Preview on RequirementGuide solves. It is a free, browser-based Markdown editor with a real-time split-pane preview. You write on the left, the formatted output appears on the right, instantly, no login required.
In this post, we'll walk through what the tool does, who it's for, how it compares to alternatives, and why it might be the only Markdown editor you need in your daily workflow.
What Is Markdown Live Preview?
Markdown Live Preview is a free online tool designed for anyone who works with Markdown regularly, developers writing README files, technical bloggers drafting posts, product teams preparing release notes, or students completing assignments.
At its core, it gives you a clean split-screen workspace: a CodeMirror-powered editor on one side with syntax highlighting and line numbers, and a live-rendered preview on the other side that updates as you type, no save button, no refresh needed.
Key Features at a Glance
1. GitHub Flavored Markdown (GFM) Support
Most Markdown editors handle basic formatting, headings, bold, italics. But GitHub Flavored Markdown goes further. The tool supports tables, task lists ([ ] and [x] checkboxes), strikethrough text, and fenced code blocks with language hints. If you write for GitHub, GitLab, or Notion, everything renders exactly the same way here.
2. CodeMirror Editor with Syntax Highlighting
The editor is built on CodeMirror, the same editor used in tools like CodePen and Jupyter Notebooks. This means you get proper syntax highlighting inside code blocks, line numbers, smart indentation, and a comfortable writing experience, not just a plain textarea.
3. Resizable Split Panes + Sync Scroll
You can drag the divider between the editor and preview to adjust how much space each side takes. Enable sync scroll and the preview follows your editor position automatically, useful when working on long documents so you're never lost between two panes.
4. One-Click PDF Export
One of the most requested features in any Markdown tool is the ability to export as PDF. This tool includes a one-click PDF export that renders your formatted Markdown output into a clean PDF file, useful for sharing documentation with non-technical stakeholders who don't have a Markdown renderer.
5. Copy Markdown or Rendered HTML
Two clipboard helpers let you copy either the raw Markdown text or the fully rendered HTML output. This is particularly useful if you're pasting formatted content into a CMS, email template, or documentation platform that accepts HTML input.
6. Light / Dark Theme Toggle
The tool remembers your preference for light or dark mode. Whether you're working in a bright office or a dim environment at night, your eyes will thank you.
7. Mobile-Friendly Tab Mode
On smaller screens, the split view collapses into a tabbed interface, Editor tab and Preview tab. This makes the tool fully usable on phones and tablets without anything getting squished or cut off.
Who Is This Tool Best For?
Markdown Live Preview is built for people who write structured content regularly:
- Developers writing README files, CHANGELOG entries, or wiki pages for GitHub and GitLab repositories.
- Technical bloggers who write in Markdown and need to preview formatting before pasting into Ghost, Hashnode, Dev.to, or a custom CMS.
- Documentation teams preparing API docs, user guides, or release notes that ship as Markdown files.
- Product managers drafting structured requirement documents or feature specs.
- Students writing assignments in Markdown for platforms that render it (GitHub Classroom, Notion, Obsidian).
How to Use Markdown Live Preview Step by Step
Step 1: Open the Tool
Visit requirementguide.com/tools/markdown-live-preview/live in any modern browser. No account, no signup, no installation needed.
Step 2: Start Writing
The left pane is your editor. Start typing in Markdown syntax. Use # for headings, ** for bold, ``` for code blocks, | for tables. The right pane updates the preview instantly as you type.
Step 3: Adjust Your View
Drag the divider between the two panes to give more space to whichever side you need. Enable sync scroll from the toolbar if you're working on a long document.
Step 4: Export or Copy
When you're done, use the toolbar buttons to:
- Export as PDF : clean formatted output
- Copy Markdown : raw
.mdtext ready to paste anywhere - Copy HTML : rendered HTML for CMSs and email templates
How Does It Compare to Other Markdown Editors?
vs. Dillinger
Dillinger is one of the oldest Markdown editors online. It supports cloud saves (Dropbox, Google Drive) but its UI feels dated, it requires account creation for saving, and has limited export options. Markdown Live Preview is faster to open, requires no login, and has a cleaner modern interface.
vs. StackEdit
StackEdit is powerful and supports cloud sync, making it better for long-term document storage. But it's overkill if you just need quick preview and export. Markdown Live Preview wins on simplicity and speed open the page and start writing immediately.
vs. VS Code Preview
VS Code has a built-in Markdown preview but requires installation and switching between files. For quick one-off documents or when you're on a different machine, a browser-based tool is simply faster. No setup, any device.
| Feature | Markdown Live Preview | Dillinger | StackEdit | VS Code |
|---|---|---|---|---|
| No login required | ✅ | ❌ | ❌ | ✅ |
| GFM support | ✅ | ✅ | ✅ | ✅ |
| PDF export | ✅ | ✅ | ✅ | ❌ |
| Mobile friendly | ✅ | ⚠️ | ⚠️ | ❌ |
| No install needed | ✅ | ✅ | ✅ | ❌ |
| Dark mode | ✅ | ❌ | ✅ | ✅ |
Real-World Use Cases
Writing GitHub README Files
README files on GitHub are rendered in GFM. Using a tool that also renders GFM means what you see in the preview is exactly what will appear on GitHub. Write your README, preview it, copy the Markdown, paste it into your repo done.
Drafting Blog Posts for Developer Blogs
Many developer blogging platforms (Dev.to, Hashnode, Ghost) use Markdown as their primary content format. Markdown Live Preview is a perfect drafting environment write your post, check how it looks, export the HTML if needed, and paste it directly into your CMS.
Creating API Documentation
API docs often live in Markdown files. Use the tool to draft endpoint descriptions, request/response examples in code blocks, and parameter tables all with live preview so formatting errors are caught immediately.
Here's an example of how a clean API doc snippet looks in Markdown:
## GET /users/:id
Returns a single user by ID.
### Parameters
| Name | Type | Required | Description |
|------|--------|----------|-----------------|
| id | string | Yes | The user's ID |
### Response
```json
{
"id": "123",
"name": "John Doe",
"email": "john@example.com"
}
---

## Quick Markdown Syntax Reference

New to Markdown? Here are the most commonly used syntax patterns you can try directly in the tool:

```markdown
# Heading 1
## Heading 2
### Heading 3

**bold text**
*italic text*
~~strikethrough~~

`inline code`

```javascript
// fenced code block
const hello = "world";
Understanding Software Requirements: Complete Guide with 6 Key Topics

- unordered list item
- another item
- ordered list item
- another item
- unchecked task
- completed task
| Column 1 | Column 2 |
|---|---|
| Cell 1 | Cell 2 |
blockquote text
--- (horizontal rule)
---

## Pro Tips for a Better Markdown Workflow

### Use Tables for Structured Comparisons

Instead of writing long bullet lists for comparisons, use a Markdown table. The live preview immediately shows if your column alignment is off saving you from a broken table in your published post.

### Always Specify Language in Code Blocks

Always write the language after the opening triple backtick:

```markdown
```javascript   ← good
```bash         ← good
```yaml         ← good
```             ← bad (no syntax highlighting)
This enables syntax highlighting in GitHub, most CMSs, and the preview tool itself making code examples far more readable.
Use Task Lists for Requirement Docs
Task lists (- [ ] and - [x]) render as interactive checkboxes on GitHub. They're great for documenting acceptance criteria, PR checklists, or feature requirement lists. Draft them in the preview tool to make sure they render correctly before committing.
Conclusion
Markdown Live Preview is built for one purpose: getting out of your way and letting you write. No accounts, no bloated features, no distractions. Just a clean editor, a live preview, and the tools you need to finish your document and move on.
Whether you're a developer writing technical docs, a blogger drafting your next post, or a student completing a Markdown assignment this tool streamlines the entire process from writing to export in one browser tab.
Ready to try it? Open Markdown Live Preview now → no signup, no install, just write.
Also on RequirementGuide: Explore our growing collection of free developer tools at requirementguide.com/tools.